How to add a custom phtml on order success page in Magento

Currently I am pursuing M Tech in Artificial intelligence and Machine Learning. As a developer, I possess expertise in an array of technologies ranging from Magento, Python, Artificial Intelligence and Machine Learning. My passion for technology and coding inspires me to continuously learn and innovate in my field.
With this blog, I aim to share my knowledge and experience with fellow developers in the community, helping them stay updated with the latest trends and techniques in the industry.
Magento is a popular e-commerce platform that provides merchants with a robust and customizable system to manage their online stores. One of the key advantages of Magento is its flexibility, which allows developers to customize various aspects of the platform to meet specific business needs. In this article, we'll explore how to add a custom phtml on the order success page in Magento. This customization can be useful for displaying additional information to customers after they've completed an order, such as promotions, related products, or social media links. By following the steps outlined below, you'll be able to easily add a custom phtml file to the order success page in Magento.
To insert your custom template into Magento's layout, utilize the checkout_onepage_success.xml layout file within your custom module. This file becomes active when a customer is on the order success page. Within the layout file, use referenceContainer or referenceBlock to specify where to add your custom template.
Here is a simple module I've created to add the custom template:
registration.php code in the folder app/code/Amit/Orderpage
<?php
\Magento\Framework\Component\ComponentRegistrar::register(
    Magento\Framework\Component\ComponentRegistrar::MODULE,
    'Amit_Orderpage',
    __DIR__
);
composer.json
{
  "name": "amit/orderpage-module",
  "description": "Simple Magento 2 module that adds a new template on order success page.",
  "type": "magento2-module",
  "version": "1.0.0",
  "license": [
    "OSL-3.0",
    "AFL-3.0"
  ],
  "require": {
    "php": "~5.5.0|~5.6.0|~7.0.0",
    "magento/framework": "~100.0"
  },
  "autoload": {
    "files": [ "registration.php" ],
    "psr-4": {
      "Amit\\Orderpage\\": ""
    }
  }
}
etc/module.xml
<?xml version="1.0"?>
<config xmlns:xsi="http://www.w3.org/2001/XMLSchema-instance" xsi:noNamespaceSchemaLocation="urn:magento:framework:Module/etc/module.xsd">
    <module name="Amit_Orderpage" setup_version="2.0.0"/>
</config>
Block/Success.php
<?php
namespace Amit\Orderpage\Block;
class Success  extends \Magento\Framework\View\Element\Template
{
    public function getSomething()
    {
        return 'returned something from custom block.';
    }
}
view/frontend/layout/checkout_onepage_success.xml
<?xml version="1.0"?>
<body>
    <referenceContainer name="order.success.additional.info">
        <block class="Amit\Orderpage\Block\Success"
               name="amit.order.success"
               template="Amit_Orderpage::order/success.phtml"
               after="-">
        </block>
    </referenceContainer>
</body>
Specify before or after tag to specify where you want to add your template before or after order.success.additional.info container. Here after="-" will add your template to order.success.additional.info container after all other containers present in the same section.
view/frontend/templates/order/success.phtml
<?php /* @var $block \Amit\Orderpage\Block\Success */?>
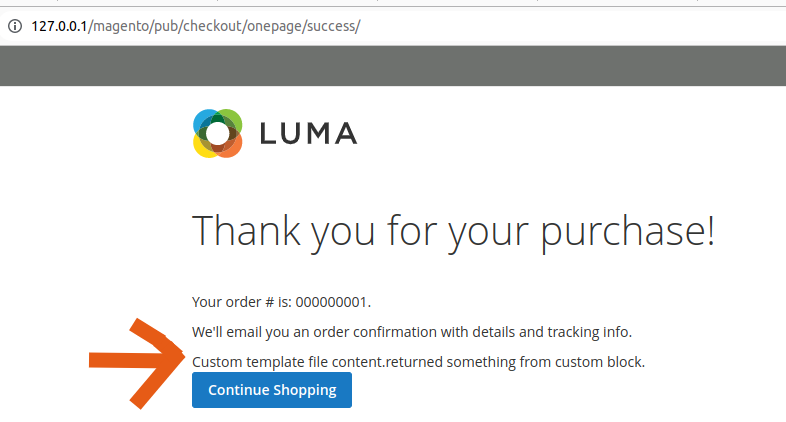
<?php echo __('Custom template file content.'); ?>
<?php echo $block->getSomething(); ?>
After completing these steps, enable your module (if you created a new one) and clear the cache.
To enable the module run below commands from your terminal
bin/magento module:enable Amit_Orderpage
bin/magento setup:upgrade
bin/magento setup:di:compile
To clear cache run the below command
bin/magento cache:clean
Give your newly customized order success page a test by placing an order. Once the order is completed, check the order success page. Your page should now display as intended, similar to the example below.