


Are you looking to create custom functionality in your Magento 2 e-commerce store? Join me as I guide you step-by-step through the process of creating a Magento 2 module, also known as a component. With Magento 2's flexible development structure, creating a module becomes easier by following these steps.
In Magento 1, business logic, layout, templates, and enabling code were written in different places, which could make module development a bit confusing. However, Magento 2 simplifies this process by allowing all components to be created in a single folder within your project directory, typically located at app/code.
Creating a module in Magento 2 can involve writing code for backend functionality, frontend display, and database management. Through this tutorial, you'll learn how to create a simple "Hello World" module to get started with Magento 2 development.
I hope this tutorial will give you a solid foundation to build on as you continue to explore Magento 2's capabilities. Don't hesitate to add a comment if you find any difficulty or want to share something.
I’ve uploaded a simple Magento 2 module on GitHub which will be taken as a reference in this tutorial. If you have any questions, leave them in the comments section and I will be happy to answer.
One of the strengths of Magento 2 is its use of Composer for managing third-party libraries and dependencies. This makes the installation and maintenance of Magento and its associated modules a breeze.
Let’s start creating a new component. Create a folder app/code/Amit/Helloworld/ in the root Magento directory, where Amit is the vendor name and Helloworld is the component/module name.
Now inside Helloworld folder create file composer.json with the following code.
{
  "name": "amit/helloworld-module",
  "description": "Simple Magento 2 module that shows uses of Controller, Block & Template.",
  "type": "magento2-module",
  "version": "1.0.0",
  "license": [
    "OSL-3.0",
    "AFL-3.0"
  ],
  "require": {
    "php": "~5.5.0|~5.6.0|~7.0.0",
    "magento/framework": "~100.0"
  },
  "autoload": {
    "files": [ "registration.php" ],
    "psr-4": {
      "Amit\\Helloworld\\": ""
    }
  }
}
Explanation of the parameters defined in composer.json
1. name is the unique name of your component.
2. description describes your component.
3. type is the type of component.
There are 3 component types in Magento:
Module (defined as magento2-module)
Theme (defined as magento2-theme)
Language (defined as magento2-language)
4. version defines the version of the component.
5. license defines the license type of the component.
6. require defines dependency modules. All modules on which this component will be dependent will be listed here.
7. autoload defines which files should be auto-loaded when this component is installed.
Next, create a file app/code/Amit/Helloworld/registration.php with the following code:
<?php
\Magento\Framework\Component\ComponentRegistrar::register(
    Magento\Framework\Component\ComponentRegistrar::MODULE,
    'Amit_Helloworld',
    __DIR__
);
Using Magento’s ComponentRegistrar’s register function we are registering our component.
create a file app/code/Amit/Helloworld/etc/module.xml. It is used to enable our component.
<?xml version="1.0"?>
<config xmlns:xsi="http://www.w3.org/2001/XMLSchema-instance" xsi:noNamespaceSchemaLocation="urn:magento:framework:Module/etc/module.xsd">
    <module name="Amit_Helloworld" setup_version="2.0.0"/>
</config>
Controllers in Magento 2
A frontend controller should be created at app/code/Amit/Helloworld/etc/frontend/routes.xml with the following code.
 <?xml version="1.0"?>
<config xmlns:xsi="http://www.w3.org/2001/XMLSchema-instance" xsi:noNamespaceSchemaLocation="urn:magento:framework:App/etc/routes.xsd">
    <router id="standard">
        <route id="helloworld" frontName="helloworld">
            <module name="Amit_Helloworld" />
        </route>
    </router>
</config>
Where router id is standard which means this controller should be applied on storefront, route id should be a unique id and front name is defined in frontName keyword which is used to access your controller like http://127.0.0.1/magento/pub/helloworld .
Now create your controller file at app/code/Amit/Helloworld/Controller/Index/Index.php with the following content:
<?php
namespace Amit\Helloworld\Controller\Index;
class Index extends \Magento\Framework\App\Action\Action
{
    protected $resultPageFactory;
    public function __construct(
        \Magento\Framework\App\Action\Context $context,
        \Magento\Framework\View\Result\PageFactory $resultPageFactory
    ) {
        $this->resultPageFactory = $resultPageFactory;
        parent::__construct($context);
    }
    public function execute()
    {
       echo "Hello World!";
     }
 }
Now open your terminal and enable the module and clean the cache using the below commands from the root of your project:
php bin/magento module:enable Amit_Helloworld
php bin/magento setup:upgrade
php bin/magento setup:di:compile
php bin/magento cache:clean
Finally, visit the controller URL like http://127.0.0.1/magento/pub/helloworld in your browser and you should see the output "Hello World! ".
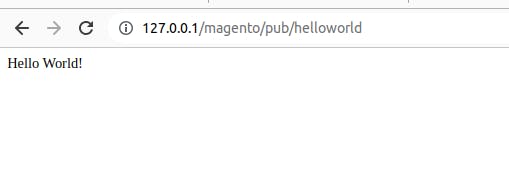
If you see this result. Great. You have successfully loaded a page using a custom URL in Magento.
Add a layout, template and Block file
Let's add a layout file at app/code/Amit/Helloworld/view/frontend/layout/helloworld_index_index.xml
In Magento 2, the layout files control the structure and presentation of the storefront pages. You can define layout files in the app/code/{Vendor}/{Module}/view/{Area}/layout directory of your Magento 2 module. The {Area} directory is typically frontend for the storefront or adminhtml for the admin panel.
Add below code to this layout file
<?xml version="1.0"?>

<page xmlns:xsi="http://www.w3.org/2001/XMLSchema-instance" layout="1column" xsi:noNamespaceSchemaLocation="urn:magento:framework:View/Layout/etc/page_configuration.xsd">
    <head>
        <title>
            I'm the title of the page mentioned in layout.
        </title>
    </head>
    <body>
        <referenceContainer name="content">
            <block class="Amit\Helloworld\Block\Sample" name="helloworld" template="Amit_Helloworld::helloworld.phtml"/>
        </referenceContainer>
    </body>
</page>
Next add the template file at app/code/Amit/Helloworld/view/frontend/templates/helloworld.phtml
Template files are used to define the visual presentation of the storefront pages. Templates are written in HTML and may also contain PHP code to dynamically generate content.
Add the below code to the template file helloworld.phtml
<?php $a = 3; ?>
<p><?php echo __('Square of '. $a. ' is: '). $block->getSquare(3); ?></p>
<p><?php echo $block->getAnotherFuntion(); ?></p>
<?php echo __('Yet another content ;)'); ?>
And add the block file where these functions like getSquare() and getAnotherFuntion() are defined. File path of the block file is app/code/Amit/Helloworld/Block/Sample.php
A block is a PHP class that is responsible for providing the data and behavior for a specific part of the storefront or admin panel. Blocks are used to organize and encapsulate the functionality of the Magento application.
The main responsibility of a block is to generate the HTML content for a specific area of the page. Blocks are associated with a specific template file that defines the visual presentation of the content generated by the block.
Add the below code to block the file Sample.php
<?php

namespace Amit\Helloworld\Block;
class Sample extends \Magento\Framework\View\Element\Template {

    public function getSquare($a) {
        return ($a*$a);
    }
    public function getAnotherFuntion() {
        $html = '<p>Make this world a beautiful place to live.</p>';
        return $html;
    }
}
Change the controller file code so that our new layout file gets loaded when the custom url is used in the browser. Replace the code of the controller file app/code/Amit/Helloworld/Controller/Index/Index.php with below code
<?php

namespace Amit\Helloworld\Controller\Index;

class Index extends \Magento\Framework\App\Action\Action
{
    protected $resultPageFactory;
    public function __construct(
        \Magento\Framework\App\Action\Context $context,
        \Magento\Framework\View\Result\PageFactory $resultPageFactory
    ) {
        $this->resultPageFactory = $resultPageFactory;
        parent::__construct($context);
    }
    public function execute()
    {
        return $this->resultPageFactory->create();
    }
}
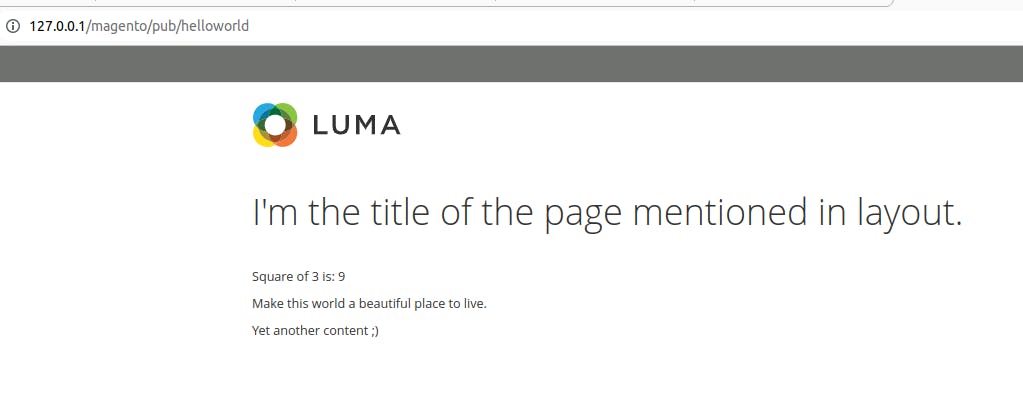
And clean the Magento cache from the terminal using the command php bin/magento cache:clean and open the URL http://127.0.0.1/magento/pub/helloworld in your browser and you should see the output below
Congratulations on creating your first "Hello World" module in Magento 2! While it may seem like a small achievement, this is a great first step towards developing more complex modules in the future. With Magento 2's user-friendly development process and flexible module structure, you now have the power to add custom functionality to your e-commerce store.
I hope this tutorial was helpful in getting you started with Magento 2 module development. Keep exploring and experimenting with Magento 2, and don't be afraid to ask for help from the Magento community. Happy coding! #Magento #Magento2 #ModuleDevelopment